Tuesday, December 28, 2010

Nauti Knitter: Swartz's A Christmas Story Cap


Well in the past month, probably longer, I have been doing a TON of knitting for Christmas presents. Sadly, that means my blog posts have been nonexistent. I do however have a great project to show you right now!

I had seen this hat a very long time ago and always thought how adorable it was. However, I would never waste my time making it because I would never wear it nor know someone that would wear it. I was proven wrong on the latter because a mom at my church asked me if I could possibly knit this hat for her son. I excitedly agreed and was very pleased with the outcome.

My luck got even better when I finished the hat. My brother and one of his friends were home for me to take pictures of them modeling my hat. My only regret is I did not take one in front of our Christmas tree.

As for the actual pattern, I thought it was a very easy pattern and actually knit up fairly quick, considering how long the hat tail is.

Now onto more of the pictures!


This last one might be my favorite picture! It reminded me of Horton Hears a Who!

Well this will be my final post before the New Year! Hope everyone had a safe and Merry Christmas!

Sunday, December 26, 2010

Flicker Account

As a blogger, you always want to think as to how you can do things better! Or in some cases, how to do them more easily. So, I decided to get a Flickr Account. I have uploaded a ton of my old knitting projects and plan on adding pictures not only on my posts to to my account. You can also use your Flickr photos on Ravelry! I am hoping this will make things easier all the way around!

Feel free to upload your photos of my projects as well!

Tuesday, December 14, 2010

Anthropology Inspirations!

Recently, I have been loving the store Anthropology. Unfortunately, I have not been loving their prices!! So I have decided that I could make some of the stuff I have seen and loved there myself.

My sister showed me a really great headband/earwarmer from there that really was just some basic braided cables! I also had just bought the perfect yarn for the project. The pattern for that will be up soon!

I also saw another great headband that I whipped up in no time! Pattern for that coming as well. (picture can be found here)

Finally, there is a gorgeous bedspread that Kojo Designs made. I definitely am planning on making that as soon as I need a new spread!

Once the holiday season comes to a close I will be posting a whole lot more often! Also I will have multiple new patterns for you to try out!

Thursday, October 28, 2010

Update

Due to an insane volleyball schedule, I have not had the time to put into my knitting and crafting. Also, I have been working on some Christmas gifts which means I can't really put them up because my family will see what they are getting and that's no fun! I already have two new patterns I have created for presents but those can't go up till after Christmas!

I have however, been able to get some stuff up on my etsy store! Go check that out!

Wednesday, October 6, 2010

Puff Quilt Photos


Here are some more better quality pictures of my puffy quilt! I am also posting some of these on my Etsy Store. So if you are interested in these quilts you can check it out there!

Wednesday, September 22, 2010

Finished Quilt

Here is the finished quilt for Samantha Marie, who we like to call Sammie.

I started this quilt awhile ago, and since it was my first quilt I had a little bit of trouble with making everything as precise as I would have liked it. Still it was a learning experience and I would encourage everyone to try it!!! I did the Honeybear Lane Puff Quilt. The directions were at most points easy to follow and the pictures helped out a lot.

The one point where I struggled was in making my own continuous bias binding and even sewing the binding on. I spent hours cutting and trying to figure out Honeybear Lanes directions on making my own binding. I don't know if it was just the way I was interpreting but it was just not making sense. I scoured google for a long time until I finally found this gem of a tutorial. This tutorial presented everything in a more concise way that made sense with how my brain works. Could be just me, but if you are having trouble with making your own continuous bias binding check this tutorial out!

Tuesday, September 7, 2010

New Patterns Page

I decided to make it easier to find all of my patterns and add in a free patterns page that you can access from the Home page. Now you can simply click on the tab and quickly see all my patterns with pictures attached!!


Thursday, September 2, 2010

First Quilt

I have decided to try my hand at quilting. I have always wanted to try it but wasn't sure if I was up to the task of a regular quilt. I came across this idea for a puff quilt. It is supposed to be much easier than a traditional quilt. I started this and figured I would share my progress with you all. It is a very simple project so far and actually hasn't been horribly expensive.

Also, they say that you need a walking foot to get this done. I sadly lost mine somewhere. So I have been doing it without one and haven't had an issue yet. One other thing I did differently was using a small handheld Singer Machine to make my individual puffs. This I think was a great way to get them done quickly and without using my large machine.

This tutorial comes from Honeybear Lane. If you scroll down there are four different steps in the tutorial that you can go through. Let me know if you decide to do this! It's been so much fun!

Quick and Easy Flower Headband

I have had a few things in the works the past month or so. Here is one of the patterns I have been working on that I truly love. I have made a bunch of these already and I must say they were quick easy and cute!

For the actual headband I used size H hook, for the flower size K hook.

Headband Pattern:

Row 1: Ch 141. SC in 2nd ch. SC in next 27 ch. HDC in next, DC in next. Ch 80. In last 30 ch from end DC, HDC in next, SC in next 27. CH 1. Turn

Row 2: SC 27. HDC, DC. Ch 80. In last 30 from end DC, HDC, SC 27. Ch 1. Turn.

Row 3: Slip stitch 26. SC, HDC, DC. Ch 80. In last 30 stitches, DC, HDC, SC, slip stitch till end.

Tie off and tuck in ends.


Flower Pattern:

Rnd 1: Ch 3. 9 DC in 3rd ch from hook. Slip Stitch to join round.

Rnd 2: Ch 2. 5 DC in same ch (Ch 2 counts as one DC). *SC in next ch. 6 DC in next ch* Continue in circle until you have 5 petals. Tie off.


Take flower and stitch it to headband with tapestry needle. Use thicker ends to tie headband on.

Enjoy!


Wednesday, September 1, 2010

Finished Garter

Even though I have been long done with the garter, I came across this picture and realized I had never posted it. I took this right after I finished and really liked how the picture came out with the colors going well with my pool!


Wednesday, August 25, 2010

Hand Knitting

If you have a really little kid that wants to start knitting, don't have needles on hand (if that would ever actually happen!) or wants to add to their skill set have them try hand knitting! Little girls can make scarves in an hour! You can't really control the width because you only have so many fingers but this is a great way for a little girl to have some fun with yarn!

This is something that I did when I was little with the stretchy bands that my Nanny used to buy for me but you can do the same thing with any yarn!

To refresh my memory, I reread directions online! Just google hand knitting and give it a go!


Thursday, August 19, 2010

Home!

I am finally home from my almost 3 week vacation. It was so incredible. Hawaii is just so impressive. The scenery is amazing, and I was surrounded by wonderful company. Here are just two of the 560 pictures I took!!
Unfortunately, I didn't spend very much time knitting. I did squeeze in a couple of baby hats. Patterns will be coming soon once I write everything out and get my pictures taken.

Also, I was on craftgawker again!! I just love that website!


Wednesday, August 18, 2010

My Knitting Club


So I started substitute teaching never realizing how much fun I would have or what it would lead to. When Lauren found out I knew how to knit one day at recess, I didn't think she was serious about learning how. At 6 yrs old I wasn't sure she would commit to it for more than a few days. I had her and Nia over to swim and learn how to knit. It ended up going really well and these girls caught on so quickly!

After teaching them, I got reports from both parents that the girls couldn't put their needles down! I was so excited and continued from there to teach two other girls (pictures coming soon). I really am happy they share this love for knitting and "don't even want to watch tv just knit!" We continued to have a few knitting sessions before I left for vacation and I can't wait to continue teaching them!

After this experience, I have really been putting a lot of thought into starting a knitting group where young girls can come and learn how to knit. At my church we have small groups and I think this would be the perfect opportunity for me to share my knitting knowledge!

Sunday, August 15, 2010

Vacation Update

Luckily, I have a few things saved up to post while I am gone for the next two weeks. I also am making two hats for a friend's photography studio. She is starting to do newborn photograph and found some adorable hats she wants to use as props!

After showing me some pictures of sample hats from an online boutique I scoured the internet looking for the perfect patterns. Go figure I would end up deciding to make my own patterns because I couldn't find the "perfect one." While I am working on these patterns I figure I would post a few pictures so you can see what I have been up to!
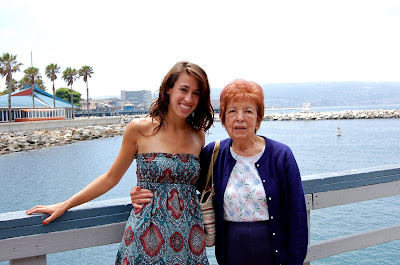
This is me with my great- aunt Blanche. It was so wonderful to see her! It had been quite awhile since I last was out in L.A. She told me I looked like a Romanian Gypsy with my dress. Good to know I look like her side of the family!!

This is me with Ms Paula. After moving from MI 6 years ago, who would have thought she would end up less than 2 miles from my dear aunt!!


Here is a shot I took at Palos Verdes. It was a great day to be out by the beach!

As soon as I get all my pictures uploaded from Hawaii, I will put up a post with all of those.

Sunday, August 1, 2010

Easy Hair Flowers

Well in a few short hours, I get on a plane to go to Hawaii! I spent the past four days visiting some family and friends in L.A. I had such a wonderful time that I wasn't even thinking about posting anything!

I made some hair flowers for a wedding I went to a few weeks ago, and it was a hit! I got multiple compliments on them. I had so many people asking me how to make them that I figure this would be the place to do so!

After a "craft day" with Sydney, Sohpia and Serena, we took a few pictures of what we made. They did their own cutting and picked out their own colors. I handled the hot glue gun and the lighter! I think we all looked great after our flowers were finished! Of course Serena need to have hers on a headband because "she is a headband kinda girl."


In order to make these flowers, You will need a lighter, hot glue, a bobby pin, measuring tape scissors and fabric. You can also have the option of beads or buttons for a center. I used three different kinds of fabric tulle, organza, and silk. You can also use chiffon.

Then you take your measuring tape and measure circles 3.5 in diameter of the silk. Cut two of the circles and set aside. The you do the same with the organza but with 3 in circles. Then measure 2.5 in circles with the tulle. Continue in the pattern making the circles .5 in smaller each time (2 in silk, 1.5 in organza, 1 in tulle), You should have 12 circles total, two of each size.

**For Serena's headband I simply cut the amount of circles in half and did two smaller flowers. Start with 2in circles and move down from there.**

Then I take a lighter, I use one of those larger bbq lighters because I actually burned through a small lighter! I didn't even know that was possible! Well the things you learn crafting! Carefully burn the edges of the fabric, keeping in mind that tulle will not curl the way the other fabrics will. This is how you get the curled look that you see in the pictures.

After you have burned all of the pictures, you need to attach all the layers together. I have finished these two ways. One simply with a hot glue gun or by sewing the layers together. I prefer the hot glue. This provides extra strength to them as long as you don't gob on too much glue. You can even glue multiple layers at a time because the glue runs through the thin fabrics.

After you get the, glued together you can add your center. I have used buttons and beads, but go ahead and be creative!! You can also glue bobby pins or clips the back of the flower to easily secure them in your hair.


Well there is a starting point! Go ahead and get creative with these!

Monday, July 26, 2010

Harry Potter Gloves

The youth group at my church left for their mission's trip to South Africa yesterday.
After realizing that it is cold this time of year there, one of the girls asked me to knit her gloves that match her Harry Potter double knit scarf I had made for her awhile back. I immediately had the idea of making these convertible gloves! I love how the colors look. Sadly I didn't realize that the second picture was blurry until I had already dropped the gloves off! I still love these gloves and think that
there may be a pair in store for me this winter!

I had a few patterns that I had looked at previously to doing these gloves and kind of just did what I thought would work out best changing things around with different techniques. I will post the pattern later I just wanted to get the pictures up!


Monday, July 19, 2010

I am on craftgawker!

I received an email today that informed me that one of my photos was accepted by craftgawker. It was actually the photo I had posted on my last post so I am sure most of you that are reading this have already seen the photo. As of right now it is still on the first page of the website so go check out craftgawker.com

I have been really trying to get a better grasp on photography skills. I have a fairly nice Nikon camera that has the ability to take nice picture, must be the person behind the camera that has yet to figure everything out. Needless to say, I am very pleased that some of the work I have been putting into taking better pictures has somewhat paid off. There are many bloggers who specialize in photography and have some great tutorials so check them out!

Thursday, July 15, 2010

Nothing New


I have spent the last week running a volleyball camp at a high school in the area this week. It has been a crazy week though which means not to much knitting was done. Currently I am working on a pair of convertible gloves for a friend of mine that is going to South Africa for a missions trip in about a week. I am almost done with the first glove! Just trying to get the finger holes finished. This is the first time I have made gloves so I am working my way through them while trying to get everyone exactly right!!

In the meantime... I wanted to post a picture I took while I was at West Palm Beach this February. It's storming right now and I saw this and was wishing I was there!


Friday, July 9, 2010

Finished Sock

Well I completed one sock. I personally think it looks pretty great for my very first sock. As I said earlier I used this pattern that I found on Ravelry. I decreased on every round on the toe to get the shorter toe. This is a perfect sock to wear with flats. Once I finish the second sock, I will be sure to take pictures of the completed set while wearing flats.


Tuesday, July 6, 2010

Finished Garter!

I very much enjoyed the process of making this garter. It was a pretty pattern and very easy to follow. Here is the garter during the knitting process. Obviously it needs to be blocked before you can truly see the lace pattern.


Here is my beautiful garter being blocked. I simply pinned it down to a towel on my floor. Very simple process that added so much to the beauty of the garter!


Here is a shot of the garter up close after blocking but before I added the elastic and the ribbon.


Here is a picture of the finished project. I loved the double ribbon and how the lace bunched slightly. I know the bride loved it. I would definitely do something life this again. It was fun and despite the small needles, it went by quickly.