Wednesday, January 26, 2011

Nina's Bow Holder

I know Christmas is over, but for me there is a whole slew of birthdays coming up in my family. And I truly mean a whole slew as there are 6 between Feb 13th and March 21st. So this for me means basically round 2 of Christmas. So that means more delayed posts as I can't post up all the fun projects I have in the works. I just finished one last night that I want to keep! But that will be posted soon!

SO since most of my projects cannot be posted, I will post one that I love but have no one for which to make it. My friend Nina, which also put up a post about me here (thanks for the awesome shout out btw), made something that made me wish I had a little girl in my life that would use this adorable bow holder. I am not even going to post pictures of it because I want you to check it out for yourself. She also posted the link for the tutorial where she got the idea.

So for all of you that have someone to make this for, enjoy it!

Published with Blogger-droid v1.6.5

Friday, January 21, 2011

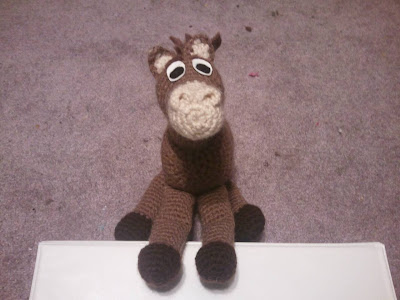
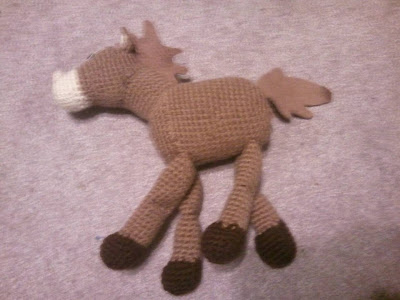
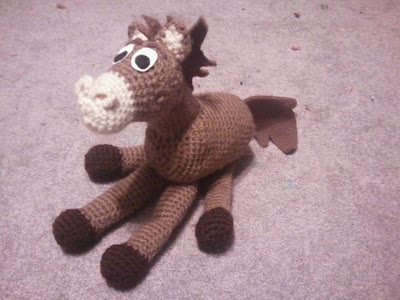
My Adorable Bullseye

Well it's not exactly mine. I just wish it was. I had someone request this awesome little guy and I was so excited when I saw it!

This actually crocheted up quite quickly despite the small hook. Or maybe I was just having so much fun watching this come together I spent endless hours "in the zone.

I however did not create this pattern. Luckily, it is a free one!

http://aprildraven.blogspot.com/2011/01/brown-pony.html

Check this great pattern out for your little one that loves Toy Story!
Published with Blogger-droid v1.6.5

Tuesday, January 18, 2011

Anthro Inspired Plaited Headband


In case you haven't noticed I have been loving everything Anthropology lately. This is just another one of my Anthro inspired knits. This one ended up looking slightly different than the one at Anthro but I still love it just the same. I may go back and rework this a little bit. We can always improve!

The pattern is pretty simple and straightforward, and knits up pretty quickly! As far as quick gifts go, this is a must!

Anthro Inspired Plaited Headband

Sz 10 needles
bulky weight yarn
cable needle
for provisional cast on: crochet hook and either another needle or scrap yarn (personally I find using an extra needle to work better.)

Cast on 12 stitches with a provisional cast on.

Row 1: K to end
Row 2: P to end
Row 3: C4 in front,*slide 4 stitches onto cable and place in front of your work, K4 off needle, K4 off cable needle,* K to end
Row 4: P 2 end
Row 5: K to end
Row 6: P to end
Row 7: K to end
Row 8: P to end
Row 9: K4, C4 in back, *slip four stitches onto cable needle placinf cable in back of your work, K4 off left needle, K4 off cable needle*
Row 10: P 2 end
Row 11: K to end
Row 12: P to end

Continue in pattern till you reach desired length, ending on Row 12. Join headband using the Kitchener Stitch.


That's all you need to do to get this gorgeous headband!

Thursday, January 13, 2011

New Facebook Page

I started this blog almost a whole year ago, and it has been a blast for me! I love having an outlet to post my patterns and share my creations with you guys. For everyone that reads my blog THANK YOU!

Recently, I have had people tell me that I need to utilize facebook more. I would always post pictures and links to my blog posts but that was about it. However, I now have decided that I think it would be in my best interest to make a facebook page for my projects. So since I recently put up my new blog banner I decided maybe this would be the perfect opportunity for me to start up that page so.... (drumroll please).....

Here it is! <- click there to go directly to the facebook page.


Above is my "like" button. Click on this to like my page and get in on the fun!

I hope you enjoy this and will use this. I am definitely excited about it!


Monday, January 10, 2011

Therapeutic Knitting

As some of you readers know, I enjoy looking into the benefits of knitting. Maybe it's to justify my addiction or maybe I really do just enjoy researching this kind of stuff. Probably just trying to justify my addiction.

This article I came across was simply the best one I have read yet. It goes over virtually all of the medicinal benefits of knitting. Including a few mentions about those who have trouble sleeping (that would be me).

It also has a section about anxiety and panic attacks. This section I found extremely interesting because I have know firsthand about multiple people who have started knitting and since then have had a decrease in panic attacks. This is because repetitive movements cause the release of serotonin. Serotonin levels effect your moods.

Click on the header of this post to read this very interesting article!


Published with Blogger-droid v1.6.5

Thursday, January 6, 2011

Darth Vader Golf Club Cover Pattern


I know, I know. I released these patterns months ago. It's also not golf season. But I had a reader make these club covers and told me I never actually put out the Darth Vader pattern. I soon realized that is because I never actually finished it. I sometimes just kind of wing things when I am getting near the end of a project and then have trouble writing down exactly what I did later. This is one of those cases.

I ended up remaking one of these things just so I could see exactly what I did. (Just for accuracies sake!)

Well here it is!

Just follow the regular golf club cover pattern (in black of course).

To transform this into Darth Vader you will need a small crochet hook. I used an I hook but anything close will be fine.

I took the crochet hook and simply created a straight line all the way around the cover right above where you start your decreases.

Once you have gone all the way around do a slip stitch as if to join the round.

Row 1: Ch 2. DC in each ch till you have gone just over half of the circle you just made.

Row 2: Ch 2. 2DC in first ch. 1Dc in each ch till last ch. 2DC in last ch.

Continue in the pattern until you have reached the desired length. Tie off.


Now all you need to do is finish him off with the double stitch pattern!

Just take some gray yarn and a plastic darning needle to finish this off. This overall is a very easy project and the perfect addition to your other two Star Wars Club Covers you have already made!


Tuesday, January 4, 2011

Minion Hat Pattern


To start, I love, love, LOVE the minions from Despicable Me. I think it's an adorable movie and wanted a minion hat so badly. Cue new pattern.

I so badly wanted to start on this before Christmas but I refrained. It was hard trust me. As many knitters know you get a new idea and want to start on it ASAP instead of doing projects you need to finish. Typical wants vs. needs! Go figure.

Anyways. I decided my easiest route was to knit a simple beanie hat and then add the details by crocheting them and attaching them to the hat. For people that only crochet or only knit I apologize.


Items needed:

(for hat)
Bright yellow yarn worsted weight
Size 10 circular needles

(for embellishments)
Gray yarn worsted weight
White yarn worsted weight
Black yarn worsted weight
Size J crochet hook
Darning needle
Batting (opt)


Hat Pattern

Cast on 76 stitches. Join round careful not to twist.

Round 1-5: *K2, P2* to end of round
Round 6+: K in round till hat is at desired length (usually 5-6 in before you begin decreases)

Decrease Rounds:

Round 1: Decrease by 6 stitches evenly throughout the round
Round 2 and all other even rounds: K
Round 3: *K7 K2tog* to end of round
Round 5: *K6 K2tog* to end of round
Round 7: *K5 K2tog* to end of round
Round 9: *K4 K2tog* to end of round
Round 11: *K3 K2tog* to end of round
Round 13: *K2 K2tog* to end of round
Round 15: *K2tog* to end of round

Take darning needle and tie off remain stitches and weave in ends.


Eyes: (make 2)

Round 1: With black yarn: Ch 3. DC11 into 3rd ch from hook (2 ch counts as one DC totaling 12 in one chain)
Round 2: Continue to work but with the white yarn. Ch 2. *2DC in first ch, DC in next ch* continue to end of round. (total 18 chs)
Round 3: Ch 2. SC in each SC all the way around

Now your eye should be rounded as to create room for some batting.


Goggle: (make 1 after making eyes)

These were pretty easy. There are two different ways that these could be done. By doing one eye at a time, or do both at once (as I did in the picture above).

Join gray yarn were white ended. DC in each ch around eye. Then take second eye and with the SAME yarn strand DC into a ch onto the second eye. Then continue to DC all the way around the second eye as you did the first.

After you are finished, Just kind of move the yarn around until it is flipped up around the eyes. This will create an almost 3D effect to it.

Then take your black yarn and ch 5. DC in the 3rd ch. and DC one into each of the following ch (3 DC total).

*Ch 2. DC one into each of the following 3 chs.* Continue making this small band until it fits around the middle of your yellow hat.


Now all we need to do is attach everything! I simply took a darning needle and attached everything. Make sure you're careful because things can end up looking crooked with the black band. The best way to do it is draw a small guide on the actual hat and then sew over the line.

As for the eyes, those are pretty simple. Just make sure you put a small amount of batting to fill out the eyes.


Then that's it! You will have one of the most amazing little hats ever!

Saturday, January 1, 2011

Great Hat Pattern Link!

I ran across this link while I was doing some research on knitting hat tops. It's very easy to follow a pattern to get the perfect hat, but what is really the science behind it? This website has a calculator that helps explain some of this. So for someone that I creating a hat pattern, or just wants to learn a little bit more about how you can create your own custom fitted hat here is a great link!