Pages

Wednesday, May 19, 2010

Wedding Garter Ideas

One of my friends is getting married in July and I am going to make her garter. It is supposed to be her something blue and she wanted it to be elastic not something that ties on only.

I have gotten a few ideas off ravelery such as: this and this. Comments or any other ideas of where to get a nice garter that would fit the above description would be great!

Monday, May 17, 2010

Gray Beret


I love this hat. I think it is beautiful. I posted a few pictures before it was finished but now it's complete and up on my Etsy store (click the link on my sidebar) The lace pattern shows up fantastic on the gray yarn.

Saturday, May 15, 2010

Easy, Breezy Summer Beret

So another new hat pattern! I for some reason have been knitting a lot of hats lately! Who even knows why. But out of all the knitting has come a couple great hat patterns. Check out this slouchy braided cable hat here. That hat is more suited for the colder months but this beauty is perfect for the upcoming seasons. I chose yellow for a few reasons 1) I had it in my stash but more importantly 2) it is perfect for summer and accentuating the pattern!

This yarn is worsted weight cotton yarn that I had purchased from City Knits in Mt Clemens, MI. If you are ever in the area check them out! I had purchased this yarn for some dishtowels for my sister and ended up with a ton left over, hence the hat.

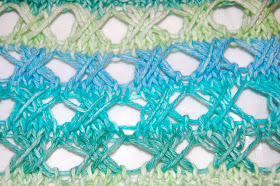
I decided to work with elongated stitches in order to create an airy and light feel to the hat. As you can see in the bottom picture, I just finished the hat by doing simple purl rows and decreasing slowly.


Easy, Breezy Summer Beret

Sz 10 circular needles
Cast on 64 stitches

Join round careful not to twist.

Rib Pattern: Work in round making a rib pattern K2, P2 continue for 6 rounds maintaining rib pattern.

Next row: knit across round increasing by 4 stitches for a total of 68 stitches.

Now we are ready to start the elongated stitch pattern.

Elongated stitch pattern:

Row 1: K

Row 2: 2YO, K

Row 3: Slide the 2YO strands off the left needle. Slip the following stitch onto the right needle purlwise. Repeat 3 more times until you have four elongated stitches onto the right needle. Slide the four stitches back onto the left needle (again purlwise) Take the elongated stitch that is furthest from the tip of the needle and pull it over the other three to bring it to the front of the needle. K the four elongated stitch and repeat to end of round.

Row 4: K

Row 5: 2YO, K

Row 6: Slide the 2YO strands off the left needle. Slip the following stitch onto the right needle purlwise. Repeat 3 more times until you have four elongated stitches onto the right needle. Slide the four stitches back onto the left needle (again purlwise) Take the elongated stitch that is closest to the tip of the needle and pull it over the other three to bring it to the back of the needle. K the four elongated stitch and repeat to end of round.

I repeated this 6 round pattern twice for my hat. Then you begin your decrease.

Row 1: K (this will join your elongated stitches together a little bit tighter so it will look uniform with the rest of the hat) (68 sts)

Row 2 and 3: Purl (68 sts)

Row 4: P15 P2tog repeat till end of the row (64 sts)

Row 5: P

Row 6: P14, P2tog (60 sts)

Row 7: P

Row 8: P8, P2tog (54 sts)

Row 8, 9, 10: P

Row 11: P7, P2tog (48 sts)

Row 12, 13, 14: P

Row 15: P6 P2tog (42 sts)

Row 16, 17, 18: P

Row 19: P5, P2tog (36 sts)

Row 20, 21, 22: P

Row 23: P4, P2tog (30 sts)

Row 24, 25, 26: P

Row 27: P3, P2tog (24 sts)

Row 28: P

Row 29: P2tog (12 sts)

Row 30: P

Row 31: P2tog (6sts)

Using a tapestry needle, take 6 remaining stitches and sip them onto the tapestry needle and tightly close the top of the hat. Finish ends.


Also if you are looking for other great hats to make check out this braided cable hat!

Hope you enjoy this beautiful hat. Also remember to follow my blog or follow me on Twitter to get all my blog updates!

Friday, May 14, 2010

Finished Sweater!


A few months ago, I set out to make my first sweater. Click to see the pattern and original pictures. Here was my post on how I blocked the sweater (another first for me!) And even had one major mistake!

Well, it's now finished and I took some pictures of my sister modeling it for me. I finished the sweater a couple weeks ago and got the chance to wear it a few times before it began to get warm out. I got a ton of compliments on it. I was pretty happy with how it turn out although it was a little big in the waste and I had to go back and take it in again.

Here are the pictures! Turned out pretty much just how I imagined it. I think next time I will have a little bit more confidence to adjust the sweater to fit me more exactly or maybe even change some of the edging to make it even more unique.

Thursday, May 13, 2010

Cable Hat

I have made multiple hats using this pattern and I have used different sized needles and different weights of yarn. The pattern below is what I used for the pictured hat. This was the original hat that I did.

Sz 9 needles

Cast on 38 stitches


Row 1: P9 K1 P28

Row 2: K9 P1 K28

Row 3: P9 K1 P28

Row 4: Cable 3 in front K3, K3 from cable needle, K3 P1 K28

Row 5: P9 K1 P28

Row 6: K9 P1 K28

Row 7: P9 K1 P28

Row 8: K3 transfer 3 to cable needle hold to back K3, K3 from needle P1 K28

Repeat these 8 rows until hat is desired length. Measurement from cast on edge to needles should be about an inch less than the circumference of you head. Cast off leaving an extra long tail for seaming at the end. Seam the two selvage edges together and turn inside out. Fold hat into even fourths as shown in the picture. Seam edges and flip hat right side out again.


Hope these instructions are clear! I have gotten a ton of compliments every time I wear this hat! I have also made some in lighter colors for spring/summer!

Tuesday, May 11, 2010

Upcoming Patterns

I haven't been updating as much as I normally do for the past few days. I however, have still been knitting away! I have two hat patterns coming up soon. I forgot to write down all of my decrease rows for one of the hats. I will have to go back and count them this week so I can pass on the pattern.

Thursday, May 6, 2010

Amazing 3 Hour (or less) Cowl


I made this cowl in one day. It is called a 3 hour cowl but I don't think it even took me that long. It was really easy and fun to make! I also think it turned out beautiful. I wore it to the Vera Bradley sale and had someone stop me to compliment me on it. She was shocked to hear me say that I had made it! However, I did not design the pattern for the cowl. I used Sugar and Cream yarn and it didn't even take a whole skien! I found the pattern here. Go check out this easy project. It could be part of a fantastic Mother's Day gift!

Wednesday, May 5, 2010

Star Wars Golf Club Covers

My boyfriend was at my house the other day and had his gold clubs in his trunk. They obviously had the club covers I made him in the trunk so of course I asked him to pull them out of the trunk so I could take a few pictures. The pattern for the club covers can be found here. And the double stitch patterns can be found here.

Tuesday, May 4, 2010

Make Shift Cable Needle #2

Here is a picture of my other makeshift cable needle. This one really held the yarn so it could definitely be useful when using a yarn that keeps slipping off a metal or plastic needle. You can discover a lot of interesting things when you are stuck without the items you normally use.

Monday, May 3, 2010

New Knitting Tools!


So I spent the day going to Ft Wayne, Indiana for the big Vera Bradley outlet sale that only happens once a year. I ended up getting some fantastic deals! I walked past a table of little portfolios and thought that they were cute but didn't think I had a use for them. It took we a little while to realize how wrong I really was!


I decided that this would be a cute way to store my patterns! I also snagged this cute plastic lined bag to keep a few of my knitting notions!

Sunday, May 2, 2010

Make Shift Cable Needle

So in addition to working in an office at a sign company, I also substitute teach. In my prep hours I usually knit. I was doing elementary art this past Thursday and I forgot to being my cable needle even though I was working on a project that required one. Luckily, I was in an art room and knew I could get creative! First I tried a pipe cleaner and the yarn stuck on it. I continued to search around until I found a scrap of some kind of wire. Turns out it was a perfect size and got the job done! So there is a picture of my makeshift cable needle. Next time you are stuck without an item your knitting requires- get creative!

Saturday, May 1, 2010

Upcoming Hat Pattern


I am working on a really great hat right now. I am still working on finishing up writing the pattern and taking some pictures of the finished project, but I wanted to get a few pictures up to give a little bit of a preview. This hat isn't knit in a round but knit in a flat piece with a cabled braid at one end. It is hard to see the detailing in the pictures so I am going to have to be very careful when taking pictures to get all the details in it. I may even have to whip up another hat just so you can all see how great this hat looks in person!